Building with Bicep: From Manual to Magical


Who this is for
If you’re new to Bicep or just tired of manual deployments, this post might help you get started with a basic repeatable pipeline setup using Azure DevOps.
In one of my previous posts: Building with Bicep: A Beginner’s Journey I started to experiment with Bicep. I was deploying resources manually using PowerShell commands, for example:
# Define deployment parameters
$deploymentParams = @{
    TemplateFile         = “./main.bicep”
    TemplateParameterFile = “./main.parameters.json”
    Verbose              = $true
    ResourceGroupName    = 'rg-logicapps-shared-001'
}

# Deploy using splatting
New-AzResourceGroupDeployment @deploymentParams
Why Pipelines over manual deployment
Even though it was useful to have the Bicep templates which I could use repeatably I still have to manually type in the PowerShell Cmdlet to connect to Azure and then deploy the resources. I wanted a repeatable, automated process from start to finish and also minimising human error, so I naturally turned to CI/CD pipelines. A pipeline is a consistent sequence of steps that can be executed automatically.
Other reasons Pipelines matter are:
Trigger on changes: Ensures deployments are always up-to-date with the latest commits, reducing drift.
Fail fast: If someone breaks the build, you know immediately — not after manual testing.
Nightly builds: Catch regressions early by testing code daily, even if no one manually triggers it.
For this I decided to use Azure Pipelines. I followed the following learn path: Deploy Azure resources by using Bicep and Azure Pipelines as I wanted a quick start.
I recommend this path as it explains how to configure a service connection to your Azure tenant and how you can configure the Service Principal to be able to create resources. It will guide you when pushing your files to Azure DevOps and making changes to your files to complete your deployment.
Things you will need
You will need an Azure and Azure DevOps account.
Visual Studio Code installed
Know basic Git commands
Ability to create resource groups in Azure and Enterprise Apps in Entra.
Pipeline YAML explained
The final YAML file looks like this:
trigger:
  batch: true
  branches:
    include:
      - main

pool:
  vmImage: ubuntu-latest

variables:
  - name: deploymentDefaultLocation
    value: westus3

jobs:
  - job: deploy
    steps:
      - task: AzureResourceManagerTemplateDeployment@3
        inputs:
          connectedServiceName: $(ServiceConnectionName)
          deploymentName: $(Build.BuildNumber)
          location: $(deploymentDefaultLocation)
          resourceGroupName: $(ResourceGroupName)
          csmFile: deploy/main.bicep
          overrideParameters: >
            -environmentType $(EnvironmentType)
            -deployToyManualsStorageAccount $(DeployToyManualsStorageAccount)
Trigger
This pipeline triggers whenever there’s a change on the main branch, and the batch option ensures that if it’s triggered while a run is already in progress, it will wait for the current one to finish.
trigger:
  batch: true
  branches:
    include:
      - main
Tasks
Each step in a pipeline carries out a single operation, you can have multiple steps. Here you can see that I’m using the Task step, in this case it is a built-in task which deploys an ARM/Bicep template to a resource group.
- task: AzureResourceManagerTemplateDeployment@3The other type of steps available in Azure Pipelines is a Script where I could have used PowerShell, Bash or the Windows command shell.
The task in this case will pass the variables it gets from the pipeline variables or specified within the YAML file to the Bicep template.
Variables
Another thing to note is that I have declared a deploymentDefaultLocation variable which is used in the deployment step. All other variables like the environmentType, resource group name, serviceConnectionName are specified in the pipelines variables.
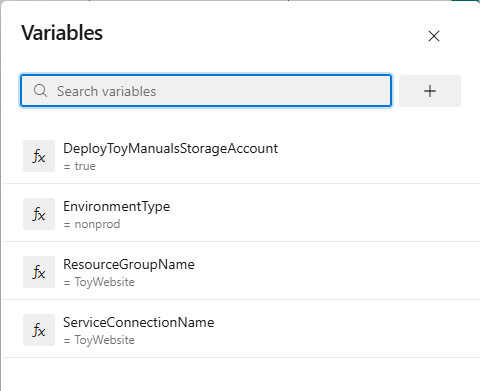
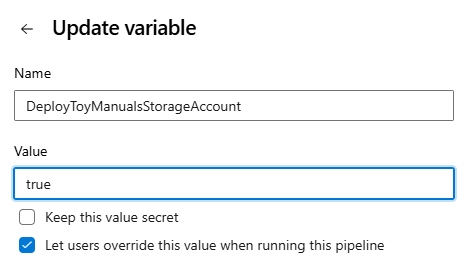
At the bottom of the YAML file you can see that I have specified which variables can be overridden:
overrideParameters: >
            -environmentType $(EnvironmentType)
            -deployToyManualsStorageAccount $(DeployToyManualsStorageAccount)
If you run the pipeline manually the user will get the opportunity to change these variables but you will need to tick Let users override this value when running this pipeline.
In contrast, the other environment variable you are allowed to override according to the YAML file is the environmentType but in the pipeline variables you will see that the user is not allowed to change this when running the pipeline.
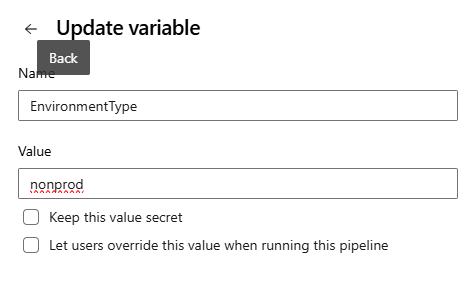
So by default the nonprod value would be used.
Bicep template Explained
In this template the required parameters are:
location
environmentType
deployToyManualsStorageAccount
resourceNameSuffix
These would be supplied by the YAML file above.
The location parameter is assigned based on the Resource Group.
There is some validation for the environmentType to make sure only nonprod or prod can be input, this is important in this case as we are basing some settings on whether it is for production or non production uses.
@description(’The Azure region into which the resources should be deployed.’)
param location string = resourceGroup().location

@description(’The type of environment. This must be nonprod or prod.’)
@allowed([
  ‘nonprod’
  ‘prod’
])
param environmentType string

@description(’Indicates whether to deploy the storage account for toy manuals.’)
param deployToyManualsStorageAccount bool

@description(’A unique suffix to add to resource names that need to be globally unique.’)
@maxLength(13)
param resourceNameSuffix string = uniqueString(resourceGroup().id)

var appServiceAppName = ‘toy-website-${resourceNameSuffix}’
var appServicePlanName = ‘toy-website-plan’
var toyManualsStorageAccountName = ‘toyweb${resourceNameSuffix}’

// Define the SKUs for each component based on the environment type.
var environmentConfigurationMap = {
  nonprod: {
    appServiceApp: {
      alwaysOn: false
    }
    appServicePlan: {
      sku: {
        name: ‘F1’
        capacity: 1
      }
    }
    toyManualsStorageAccount: {
      sku: {
        name: ‘Standard_LRS’
      }
    }
  }
  prod: {
    appServiceApp: {
      alwaysOn: true
    }
    appServicePlan: {
      sku: {
        name: ‘S1’
        capacity: 2
      }
    }
    toyManualsStorageAccount: {
      sku: {
        name: ‘Standard_ZRS’
      }
    }
  }
}

var toyManualsStorageAccountConnectionString = deployToyManualsStorageAccount ? ‘DefaultEndpointsProtocol=https;AccountName=${toyManualsStorageAccount.name};EndpointSuffix=${environment().suffixes.storage};AccountKey=${toyManualsStorageAccount.listKeys().keys[0].value}’ : ‘’

resource appServicePlan ‘Microsoft.Web/serverfarms@2022-03-01’ = {
  name: appServicePlanName
  location: location
  sku: environmentConfigurationMap[environmentType].appServicePlan.sku
}

resource appServiceApp ‘Microsoft.Web/sites@2022-03-01’ = {
  name: appServiceAppName
  location: location
  properties: {
    serverFarmId: appServicePlan.id
    httpsOnly: true
    siteConfig: {
      alwaysOn: environmentConfigurationMap[environmentType].appServiceApp.alwaysOn
      appSettings: [
        {
          name: ‘ToyManualsStorageAccountConnectionString’
          value: toyManualsStorageAccountConnectionString
        }
      ]
    }
  }
}

resource toyManualsStorageAccount ‘Microsoft.Storage/storageAccounts@2022-09-01’ = if (deployToyManualsStorageAccount) {
  name: toyManualsStorageAccountName
  location: location
  kind: ‘StorageV2’
  sku: environmentConfigurationMap[environmentType].toyManualsStorageAccount.sku
}
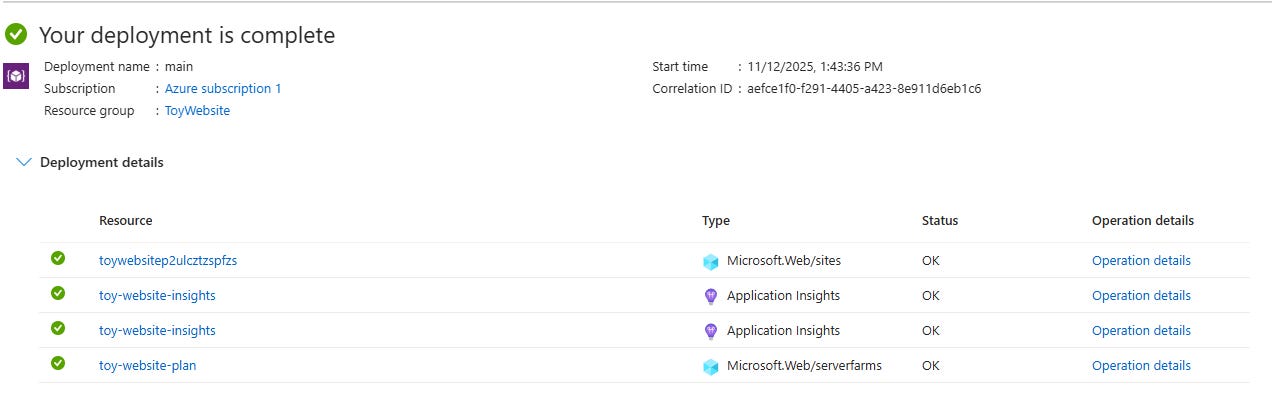
We also generate some unique names with prefixes and a unique string derived from the resource group id and we save that in variables, for example appServiceAppName would end up as toywebsitep2ulcztzspfzs.
The unique string is created in this line:
param resourceNameSuffix string = uniqueString(resourceGroup().id)Then used in several variables:
var appServiceAppName = ‘toy-website-${resourceNameSuffix}’
...
var toyManualsStorageAccountName = ‘toyweb${resourceNameSuffix}’
Conditional deployments
Depending on the value of deployToyManualsStorageAccount being true, a storage account would be deployed:
resource toyManualsStorageAccount ‘Microsoft.Storage/storageAccounts@2022-09-01’ = if (deployToyManualsStorageAccount) {
  name: toyManualsStorageAccountName
  location: location
  kind: ‘StorageV2’
  sku: environmentConfigurationMap[environmentType].toyManualsStorageAccount.sku
}
Configuration Sets
As I mentioned earlier, different settings would be chosen depending if this was prod or nonprod. For example selecting the free tier ServicePlan for nonprod and S1 for prod.
The easiest way to define the settings and group them together is to create a Configuration Set instead of defining parameters individually.
I have removed some of the lines to make it easier to spot.
var environmentConfigurationMap = {
...
 prod: {
    ...
    appServicePlan: {
      sku: {
        name: ‘S1’
        capacity: 2
      }
    }
...
You would then reference any setting within the set using the following format:
(environmentConfigurationMap[environmentType].appServicePlan.sku).Deployment
By the end of the guide you would just push the files to your remote repository on Azure DevOps to trigger the pipeline and that would create the website.
Final thought
Pipelines felt overwhelming at first. There were YAML files, service connections, triggers. But the best way to reduce fear or confusion around a topic is to work on it.
“Working on a problem reduces the fear of it.” - James Clear
Once I started things became clearer. I found the Bicep extension for Visual Studio Code really useful as this made writing the Bicep template a lot easier.
I have also been looking at GitHub Actions for building PowerShell modules and this has has also helped to further demystify pipelines, I’ve added some useful videos on GitHub Actions in the resources section.
Next up: I’ll explore how to add test stages and deploy to multiple environments using the same Bicep template.