Getting started with Plaster
Scaffold a PowerShell Project


One thing I’ve always wanted to do but never get round to doing is having some sort of template to start working on a PowerShell module. I’ve written plenty of small PowerShell modules for work, but finally decided it was time to craft a reusable template.
The Plaster module allows you to build a PowerShell file structure for your module using a template, in other words it can be a blueprint for your PowerShell modules.
Much of what I learned about Plaster came from exploring the excellent PowerShell Scripting and Toolmaking book by Don Jones and Jeffrey Hicks
Installing Plaster
Here I’m going to using the renamed PowerShellGet module called PSResourceGet to find and install the plaster module.
PS C:\> Find-PSResource -Name plaster

Name    Version Prerelease Repository Description
----    ------- ---------- ---------- -----------
Plaster 1.1.4              PSGallery  Plaster scaffolds PowerShell projects and files.
You can use the following cmdlet to install Plaster.
Install-PSResource -name plasterDiscover Plaster Cmdlets
To see the Cmdlets in the plaster module run the following command:
Get-command -Module plasterGet-PlasterTemplate: Use this cmdlet to get all available Plaster templates before running Invoke-Plaster
Invoke-Plaster: This cmdlet is used to create a set of files and folders based on a Plaster template.
New-PlasterManifest – This cmdlet helps you create a custom Plaster template manifest file where you define what you want in your template
Test-PlasterManifest – Before you use your custom template, you want to make sure everything is in order.
You can also get more general help content using:
Get-Help -Name about_Plaster.helpUsing the Default Template
First you need to find available templates, I have used the tag parameter to filter out any other template type, I found AddPSScriptAnalyzerSettings in my templates which adds a PowerShell Script Analyzer settings file to the root of your workspace.
PS C:\> Get-PlasterTemplate -Tag ModuleManifest

Name         : NewPowerShellScriptModule
Title        : New PowerShell Manifest Module
Author       : Plaster
Version      : 1.1.0
Description  : Creates files for a simple, non-shared PowerShell script module.
Tags         : {Module, ScriptModule, ModuleManifest}
Next save that to a variable so you can use it in the Invoke-Plaster command.
PS C:\> $temp = Get-PlasterTemplate -Tag modulemanifest
PS C:\> dir $temp.TemplatePath

    Directory: C:\Users\adrim\OneDrive\Documents\PowerShell\Modules\Plaster\1.1.4\Templates\NewPowerShellScriptModule

Mode                 LastWriteTime         Length Name
----                 -------------         ------ ----
lar--          06/06/2025    11:04                editor
lar--          06/06/2025    11:04                test
la---          19/10/2022    20:48            330 Module.psm1
la---          19/10/2022    20:48           3206 plasterManifest.xml
Create a hash table of the parameters to pass to the Invoke-Plaster command
$invokePlasterParams = @{
    TemplatePath    = $temp.TemplatePath
    DestinationPath = "C:\TestModule\"
}
After running Invoke-Plaster you will get a wizard where you can enter certain information like the name of the module, destination path and select which editor you will use.
PS C:\> Invoke-Plaster @invokePlasterParams
  ____  _           _
 |  _ \| | __ _ ___| |_ ___ _ __
 | |_) | |/ _` / __| __/ _ \ '__|
 |  __/| | (_| \__ \ ||  __/ |
 |_|   |_|\__,_|___/\__\___|_|
                                            v1.1.4
==================================================
Enter the name of the module: test1
Enter the version number of the module (0.0.1):
Select an editor for editor integration (or None):
[N] None  [C] Visual Studio Code  [?] Help (default is "C"): c
Destination path: C:\TestModule\

Scaffolding your PowerShell Module...

   Create test1.psd1
   Create test1.psm1
   Create test\test1.Tests.ps1
   Create .vscode\settings.json
   Create .vscode\tasks.json
   Verify The required module Pester (minimum version: 4.0.3) is already installed.

Your new PowerShell module project 'test1' has been created.

A Pester test has been created to validate the module's manifest file.  Add additional tests to the test directory.
You can run the Pester tests in your project by executing the 'test' task.  Press Ctrl+P, then type 'task test'.
Once you’re done you will have a basic folder structure for your new module, see below.
C:.
│   test2.psd1
│   test2.psm1
│
├───.vscode
│       settings.json
│       tasks.json
│
└───test
        test2.Tests.ps1
Creating a Custom Template
Using the default template included with Plaster is a good place to start, but I have been experimenting with customising my own templates.
In order to create your own custom template you must first create a plaster manifest. You can do so using the New-PlasterManifest command, for example:
# Create a new Module template manifest

$newPlasterManifestParams = @{
    TemplateName = "MySample"
    TemplateType = "Project"
    Author       = "Art Vanderlay"
    Description  = "my sample template"
    Path         = "C:\temp\mySample\plastermanifest.xml"
}

New-PlasterManifest @newPlasterManifestParams
Change the parameters to your preference. Doing it with this command ensures you start with a valid base manifest. If you want more detailed information you can find this within the PowerShell help system:
Get-Help -Name about_Plaster_CreatingAManifest -ShowWindowManifest Structure
The manifest file that gets created from the previous section will have three main sections; metadata, parameters and content.
metadata - This includes information about the manifest itself
parameters - The parameters include information that the user will need to choose from or enter.
content - This section contains the information on how to name and structure the output from your template.
The template basic structure is as follows:
    <?xml version="1.0" encoding="utf-8"?>
    <plasterManifest
      schemaVersion="0.4" xmlns="http://www.microsoft.com/schemas/PowerShell/Plaster/v1">
      <metadata></metadata>
      <parameters></parameters>
      <content></content>
    </plasterManifest>
Metadata section
The metadata section would be populated from the parameters that you provided when creating the manifest using New-PlasterManifest.
Parameters section
Here you can define things like the name of the module, any tags and the description. At the very least you would usually add the name, version, author and description.
These are supported types of parameters:
text
choice
multichoice
user-fullname and user-email - Default values are retrieved from the user's .gitconfig if no stored value is available
All parameters would go between the <parameters> block:
<parameters>
   <parameter name="example" type="text" prompt="Enter something" />
</parameters>
Below are some basic parameters like the name and description, which are of the text type:
<parameter name="ModuleName" type="text" prompt="Enter the name of the module" />

<parameter name="Version" type="text" prompt="Enter the version of the module" default="0.1.0" />

<parameter name="Description" type="text" prompt="Enter a description of this module" />
The following example is of the user-fullname type which comes from your git config if the user does not provide anything:
<parameter name="ModuleAuthor" type="user-fullname" prompt="Enter the module author name" />In the example below I will use the multichoice type to prompt the user for any extra options such as including a devcontainer or a pester test directory. Multichoice enables the user to choose one or more options. I could have separated these choices into separate prompts with either yes or no choices.
<parameters>
...
<parameter name='Options' type='multichoice' default='3' store='text' prompt='Select desired options'>
<choice label='&Pester test support'
help="Adds Tests directory and a starter Pester Tests file."
value="Pester"/>
<choice label='&DevContainer support'
help="Adds DevContainer support for development in a container."
value="DevContainer"/>
<choice label='&None'
help="No options specified."
value="None"/>
</parameters>The value 3 means that ‘None’—the third item—is selected by default
In the next section we can get the multichoice options to add Files and Folders
These parameters will be the prompts you get when invoking plaster, they create automatic variables which you can reference in the content section of the manifest. Just pressing enter at each prompt will accept the default.
Content section
Copying Files
In order to copy the files into the destination module folder they need to exist alongside the “plastermanifest”, either in the same folder or subfolders. I just have them located in the same folder, for example the “devcontainer.json” and module.psm1, below is an example of files you might want to copy:
        basicTest.ps1
        changelog.txt
        devcontainer.json
        Dockerfile
        License.txt
        module.psm1
        plastermanifest.xml
        README.md
You could organise these into different folders.
In the content section of your plaster manifest you will need to include a file element with the source relative to the manifest file and the destination which would be the root folder of your output module.
<file source="changelog.txt" destination="changelog.txt" />
<file source="README.md" destination="README.md" />
<file source="license.txt" destination="license.txt" />
Conditions
For the optional files where we used the options parameter in the parameters element we need to create some conditions within the content element.
<file condition="$PLASTER_PARAM_Options -contains 'DevContainer'" destination=".devcontainer/devcontainer.json" source="devcontainer.json" />

<file condition="$PLASTER_PARAM_Options -contains 'Pester'" destination='Tests\${PLASTER_PARAM_ModuleName}.tests.ps1' source='basicTest.ps1' />
You can see that Plaster variables that derive from the parameters are all prefixed with $PLASTER_PARAM_.
You can also use conditions in message elements to display a message during the Plaster wizard if a certain condition is true, for example:
<message condition="$PLASTER_PARAM_Options -contains 'pester'" text="Pester support will be added to the project." />

<message condition="$PLASTER_PARAM_Options -contains 'devcontainer'" text="DevContainer support will be added to the project." />
Required modules
Since we have the possibility to have a pester test file in our new module we can include a condition in a requiremodule element to check if Pester is actually installed, this will simply show an error if it is missing
<requiremodule
   condition="$PLASTER_PARAM_Options -contains 'Pester'"
   name="Pester"
   minimumVersion="5.7.1"
   message="Pester is required for testing support. Please install it from the PowerShell Gallery."
 />
Dynamic Templating
One cool thing you can do with plaster is create files that include dynamic content. You can use the <% %> tag in text files and a plaster will replace that with builtin parameter value such the date, the TemplatePath, hostname etc and also any manifest parameters you have defined like ModuleName, FunctionFolders etc.
In the the following example I create a txt file and include the ModuleName variable which will be replaced when invoking the template and after the user has entered all the parameters required.
changelog.txt contents which has a the modulename paramter specified in the manifest and the Date builtin parameter:
#Changelog for <%=$PLASTER_PARAM_ModuleName%> created on <%=$PLASTER_Date%>In the plastermanifest I need to enter a templateFile element as opposed to file.
<templateFile source="changelog.txt" destination="changelog.txt" />The result would create a changelog.txt file with the following content in the output folder:
#Changelog for demomodule created on 16/06/2025The built in parameters are as follows:
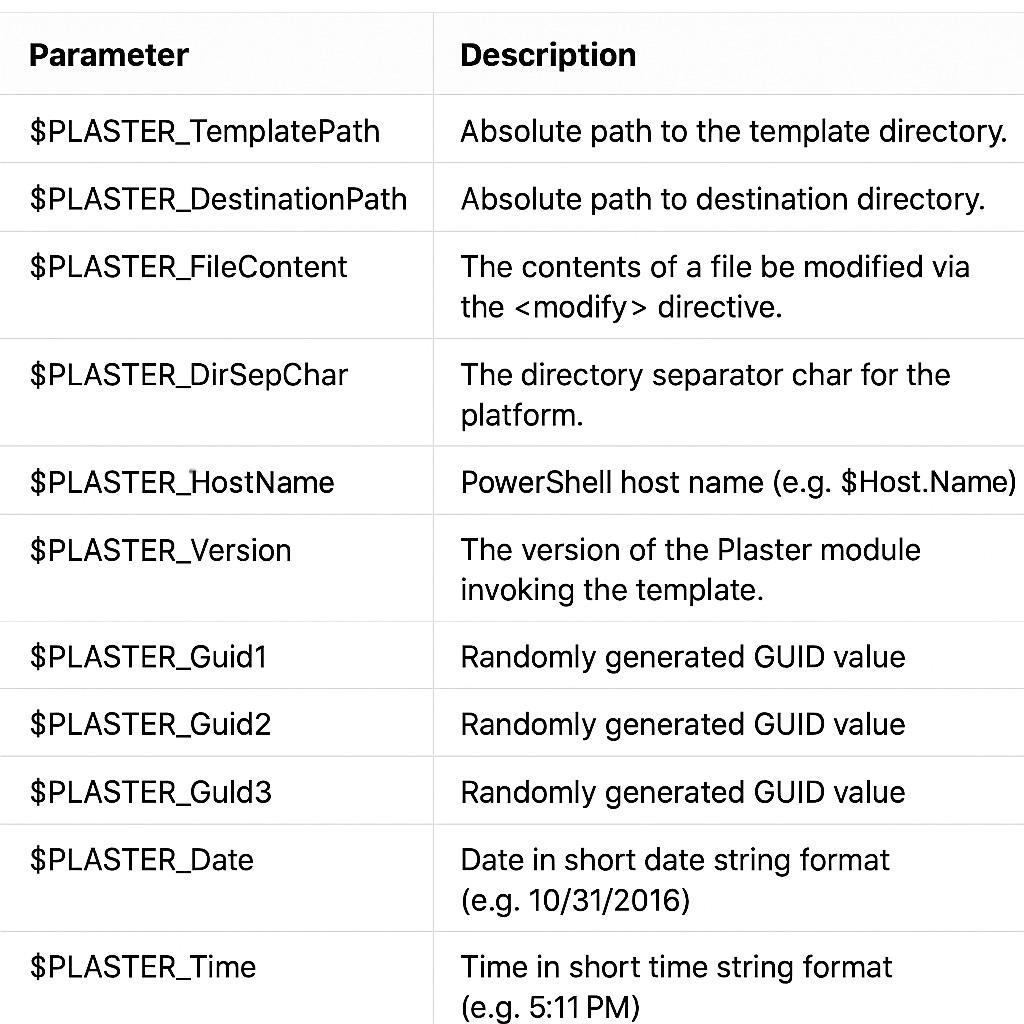
> You can explore all the example files discussed above here: GitHub – Plaster Templates
Conclusion
I have kept the example of creating a custom template quite simple, but you can make it as detailed as you need. You can also include some logic with conditions within the <% %> tags in a .ps1 file to include strings with PowerShell code that would appear in the destination file as just PowerShell code.
The Plaster module doesn’t seem to have changed in the last few years but it gets the job done. There might be other ways to do this kind of thing for example with a templating module called Mold and I also saw a chat on the PowerShell Discord Server which mentioned something about dotnet new, I’ll give these a try in the future to see how there compare.
> 👣 Up Next: > In Part 2, I’ll guide you through using Plaster to create parameterized function templates that drop into your modules.
Resources
Using Plaster to create a PowerShell Script Module template | mikefrobbins.com
Working With Plaster – OverPoweredShell.com – By David Christian